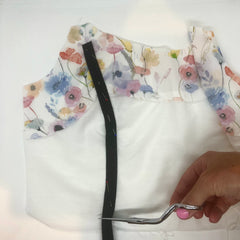
Spiral steel boning doesn't have to mean corsets and highly structured dresses. For this week's Tips on Tuesday I thought I would show you an easy way to improve the silhouette for parts of garments that need a bit of extra help to lie flat.
I have been making the B6453 out of a cotton yarn dyed dobby (the dobby refers to a slight texture woven in to the fabric). The fabric is medium to heavyweight and whilst I have been pleased with the results the top of the back bodice over my shoulder blades was not sitting as I wanted. So I decided to add just two pieces of boning on either side of the centre back zipper.
Here is how it looked before the boning was added. It wasn't terrible, but there were quite a few horizontal lines running across the back bodice.
And this is how it looked once the boning had been added. A small, but noticeable improvement.
This is how it looks on the inside of the dress. You can see that I placed the boning in the lining of the dress, running up towards the shoulder strap.
For those of you that aren't familiar with using spiral steel boning, here's a run through on how I did it.
1. You'll need to start by making a channel for your boning. I used a cotton casing specifically for this job, but twill tape or bias binding will also work well. Pin the casing roughly to the part of the garment where you are adding the boning. This is to work out how long you need the casing to be. Cut the casing the length that you need it. I have chosen a black casing here so it shows clearly in the photos, however a white casing would provide much better results:)
2. If you are using a casing like I am you will see that there are grooves running down the edge of each side. I use these as a guide for stitching. Pin using these lines and stitch in place. I am using an edge stitch foot here to make it easier to follow the lines accurately. Stitch right on the edge of the casing on both sides.
3. Once it's stitched to your lining you will need to make your spiral steel boning the correct length. You can also buy pre-cut boning but I am using a continuous length here. Lay the boning on the casing. Make your boning slightly shorter that the casing so that you can stitch across the bottom and top opening of the casing to keep the boning in place. 1-1.5 cm shorter will be enough. I am using a tool from the local hardware shop to cut the boning.
4. I use the Prym vario pliers with attachments to attached the tips to the spiral steel boning. This is to stop the boning making a hole in the casing plus it's more comfortable to wear as there aren't any sharp metal pieces digging in.
I've previously written a blog on attaching these
here. Pre-cut spiral steel boning will already have tips attached.
5. It's a pretty straight forward process, but you do need the right tools for this to work. A good alternative if you'd rather not invest in all the various tools, is plumbers tape. You'll need to wrap this around the end of the boning.
To attach the tips with the Vario pliers place the tip on the end of the boning. With the correct dies attached to the Vario Pliers squeeze these together carefully as shown in the photos below.
6. Feed the boning into the casing and stitch across the top and the bottom of the casing to keep it in place.
8. Then continue as per the pattern instructions with attaching the lining to your main garment fabric.


