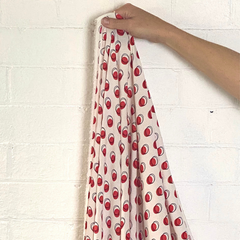
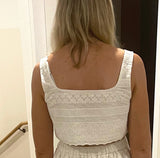
Quick Details:
Pattern: The Titillating Tank by Gracie Steel
Size: E
Fabrics: I used Pink Ecovera Rayon Spandex Jersey (95% Ecovera Viscose, 5% Elastane) and a Teal Double Knit Rayon Polyester Spandex Ponte (85% Polyester, 12% Viscose, 3% Elastane) both from Spotlight.
Labels: Handmade for the Pink top and and Circa 2024 for the dress. Both by KATM labels.
Head to the podcast to hear Kylie and I discuss the ins and outs of working with stretch fabrics. Getting the fit just right might seem daunting due to the variety of knit fabric composition and stretch percentages, but it's worth the effort for a piece that'll become a go-to in your closet.
I needed to make a bust adjustment, which definitely improved the fit. Initially, I chose a fabric that was both very stretchy and firm, but it didn't quite match the style I wanted and was too firm for everyday wear, it was more of a gym top, but once I switched fabrics, everything came together!
After making a high-back, wide-strap top with a slight crop, I was inspired to tackle the dress version. This pattern truly offers a lot of options!
I also gave the seraflex stretch threads a go. These are a great option for testing fit without having to unpick overlocking or stretch stitches!
Gracie's pattern comes packed with helpful tips and thorough instructions for working with stretchy materials.
Check out Kylie's awesome version (narrow strap mid back) of the top here.
If you're excited to try your hand at the Gracie Steel Titillating Tank don't miss #5 of our podcast on Spotify, Apple Podcasts, Audible, and Google Podcasts where you can get the full low down.
I opted for a size 10 and graded out slightly at the waist, though this probably wasn't entirely necessary, but it did add to the skirts comfort!! The material I chose was silk cotton voile, which struck the perfect balance between being easy to sew and swishy to wear.
]]>
Ep. 3 This month we bring you The Sia Dress by Marsha Style Patterns. A Mini or midi length dress with two sleeve options and perfect for a whole host of occasions.
]]>
Here's the quick rundown:
The Sia Dress packs in some really cool details - you can choose between short sleeves with ties or a mid-length puff sleeve, it's got side splits in the skirt, a low V neckline, front bust pleats, and a shaped waistband.
It's labelled as an intermediate pattern, but don't stress – the instructions are super clear. If you want to keep it simpler, there's also an option without the lining.
I decided to make a toile for the bodice, and I'm glad I did as I needed to tweak a few things to get it just right. If you're after a specific fit, taking this extra step is worth it. And if you're worried about the low v-neck, it's easy to adjust to make it higher, either by sewing or adding a hook and eye as per the pattern instructions.
I really like this dress and all its features, though it's a bit different from my usual style. Seeing Taree in hers I can see why the Sia dress is so popular. I definitely need to up my shorts and t-shirt game!
Check out Kylie's amazing version of the Sia Dress here.
If you're keen to give the Sia Dress a go then tune into Episode #3 of our podcast on Spotify, Apple Podcasts, Audible, and Google Podcasts where you can get the full low down.
And here’s a little treat for you – fancy a 20% discount on the Sia Dress? Just use this code: SEWINGCLUBPODCASTDISCOUNT.
Happy sewing, everyone! 🎉✂️🧵
]]>
We are absolutely buzzing to share with you Episode 2 of The Sewing Podcast. It's another amazing pattern from Friday Pattern Co - The Sagebrush Top and it's a real gem!
Designed amidst the whirl of Covid, it's just the ticket for those Zoom calls where you want to look professional (but still be comfy, of course). I'm absolutely smitten with its statement sleeves and the cute frill on the chest.
Here’s the lowdown:
Pattern: The Sagebrush Top by Friday Pattern Co.
Size: 6
Fabric: Sewing Gem Fabric Collette
Sewing Label: From The Stash
It has a fairly roomy fit, but I did a few alterations to suit my frame. This usually means a broad shoulder adjustment. I also fancied the ruffle a bit lower, so I dropped it by 3cm. Plus, I did a bust adjustment by adding 1cm to the centre front (probably the simplest bust adjustment you'll ever do!) and left the sleeve open which made it easier to wear in Brisbane's heat.
The fabric is a linen broderie from Sewing Gem that I dyed a lovely light blue. It was actually leftover from a dress I made for my daughter. This should have been a quick sew, but binding all the seams did add a bit of time to the project. Definitely worth the finish. Next on my list is a slinky version for this amazing wardrobe staple!
Check out Kylie's gorgeous Sagebrush here!
Fancy giving the Sagebrush Top a whirl yourself? Tune into Episode #2 of our podcast on Spotify, Apple Podcasts, Audible, and Google Podcasts. You'll find all the juicy details and show notes there.
And here’s a little treat for you – fancy a 30% discount on the Sagebrush pattern? Just use this code: SEWINGCLUBPODCASTDISCOUNT. Go on, treat yourself!
Happy sewing, everyone! 🎉✂️🧵
]]>
Ready to dive into the wonderful world of Zadie? Tune into the podcast, Episode #1, available on Spotify, Apple Podcasts, Audible, and Google Podcasts for a super-detailed Zadie review! All show notes can be found here too.
If you're feeling excited to stitch up a Zadie snag a cool 10% discount on the pattern using this code: SEWINGCLUBPODCASTDISCOUNT.
Happy sewing! 🎉✂️🧵
So here's how!...
1. Start by carefully marking the eyelets placement. This will depend on the size of the eyelet and how many are needed. A simflex is a really good device for this job. It's definitely a time saver!
2. A device for making a hole in your project will be included in your packet of prym eyelets. The particular device will depend on the size of the eyelets. The one pictured below was for the 5mm eyelets. Attach this device to your Prym pliers as shown below.
3. Where you made your first mark for the eyelet placement attach the pliers and squeeze to make a small hole.
4. I found my hole wasn't quite big enough so I used a small pair of embroidery scissors to twist in the hole and increase its size slightly.
5. Now we are ready to insert the eyelets. Familiarise yourself with the two parts of the eyelets. They look like the picture below. Let's call the left side 'the ring' and the right side 'the post'. The part that is easy to confuse is the ring. One side is very slightly raised and rougher to touch.
6. Remove the hole punching attachments from the pliers and insert the eyelet attaching pliers. Here are the size 5mm shown below.
7. The post part of the eyelet will sit on the attachment with the hole in the middle and the ring will sit on the attachment with the raised centre.
8. I like to start by pushing the post part of the eyelet through the hole that you made earlier. Remember that the front of this part will be on the front of your project. Insert the post from the right side of your garment to the wrong side
9. With the post facing down in the project I then place the ring on the pliers like so, with the slightly rougher/raised side facing the project.
10. Place the post of the attachment with the ring underneath through the part of the eyelet already in your project.
11. Squeeze the pliers together firmly.
The first image shows the front of the eyelet. The second shows the back of the eyelet and the final photo shows the finished eyelets on the corset.
]]>
1. First you will need to measure how much the hem needs to be taken up. Click here for a previous tips on Tuesday on working out how much the pants should be taken up.
2. Then turn the pants to the right side and turn the hem up with right sides of the pants facing each other. Create a fold half the amount to be taken up. The pants in the picture below are being taken up 3cm in total so the fold has 1.5cm on each side. The fold needs to meet the original stitching line on the hem.
3. The hem should be measured, marked and pinned all the way around the pants.
4. The hem is sewn with normal thread (not top stitching) which matches the pants. This is sewn next to the edge of the original hem, on the yellow line marked in the photo, the same place where the pants are pinned. It may be a good idea to take off the flat bed attachment so that the leg of the pants fits over and makes it easier to sew in the round. However, this may be difficult with children's or narrow leg pants. A machine foot such as a 'stitch in the ditch' foot will help to keep the stitching close to the edge of the original hem.
5. Once sewn the fold at the bottom of the leg should be pushed up inside the pants and the original hem sits at the bottom of the pants. This should be well pressed.
6. Should you wish to take up your jeans by quite a lot, you will have a much larger fold inside your jeans. As long as you do not need to lengthen them again, this fold can be cut away to reduce the bulk and the raw seams can be serged or zig zagged so that they don't fray.
]]>Once you have completed the measuring and marking stages that can be found in the previous blog follow the steps below:
1. Cut the excess off the bottom of the pants. This can be the scary / no turning back part!:)
2. Turn the pants inside out and press the hem up to the first line. In this case I pressed it up 1.5cm and I used a hot hemmer to help me. The raw edge of the pants should touch the marked line for where the pants will finish once hemmed.
3. Repeat this step again by turning the hem up once more. You need to make sure that the bottom of the pants are folded exactly on the stitching or marking line that will become the new bottom edge of the pants.
4. When folding, I like to snip some of the bulk out of the side seams as shown below. Make sure you don't remove too much as when it is folded you want it to look the same all the way around.
5. Measure the amount folded up to check it is the same all the way around. Give it a good press. I find using a sleeve or trouser board makes the job easier as it lifts the area that needs pressing off the rest of the pants. Place a few pins in to hold the hem in place.
6. Turn the pants right side out. As you are going to be sewing from the right side of the jeans or pants take the pins from the wrong side and place them on the right side, as shown below. Measure to check that each pin is the same distance from the bottom of the pants and that the pin is catching the fold on the inside of the pants. I pinned mine at around 1.3cm as the fold inside was 1.5cm. Check the inside and outside before sewing.
7. Depending on the pants or jeans that I am taking up I like to use a denim needle. It is a good idea to try and match your top thread to the rest of the pants and often a denim thread works well. I prefer to use a standard thread in the bobbin. I also like to use a longer stitch length for jeans, depending on the fabric, around 3 - 3.5mm. You can find a selection of denim thread and needles here.
I will always test my stitching on some scrap fabric before I begin (I often use the section that I snipped off the pants in step 1). Fold it over a few times so that it is similar to the hem that you are going to be stitching. Before sewing the actual hem I compare the quality of the stitching and the stitch length to the stitching already on on the pants and amend accordingly.
8. I use the pins as a guide as I sew. I also like to use an edge or guide foot. You can see that I line the guide up with the fold of the jeans. This really helps to keep the stitching the same distance from the bottom edge of the pants.
9. When I start sewing I don't back tack, I prefer to leave both my bobbin and needle threads long. I will secure these at the end.
10. As you get near to the bulky side seams you may well find it useful to use a 'jumper'. Sew up to the bulky seam and then insert your needle and lift the presser foot. Place the jumper at the back of the foot as shown in the image below, this extra height on the foot will make sewing over the raised seam much easier as it makes the presser foot level.
11. As you come round to meet where you began stitching overlap the stitching by one stitch and then pull the pants out of the machine leaving both threads long.
12. Using a needle pull both threads through to the wrong side of the pants and sew a few stitches to secure.
One pair of hemmed jeans!!
Next week we will show you how to hem jeans by using the original hem.
]]>
Over the next two weeks of tips on Tuesday I thought I would cover hemming pants. This week will be on pinning and measuring. Next week will cover the sewing.
My go to book for alterations is Clothing Alteration Secrets Revealed by Judith Turner. There are some amazing tips and instructions in here for all sorts of alterations.
Pinning and Measuring Pants
1. Get the person who's pants you are taking up to stand on a chair or a box to raise them up slightly. Standing in front of a mirror is a good idea as both you and the person wearing the pants get to see how they look once pinned. Make sure they are wearing the shoes that they plan to wear with them and a belt if they plan of wearing one.
2. Fold the pants in towards the leg. This is more fiddly to do, but folding them up on to the outside can be distracting for the wearer to decide whether they are the right length.
3. Pin the hem in place and get them to check they are happy with the length. I try to place my pins as near to the fold line as possible.
5. Next check the pants. This is an important step before cutting and stitching. Lay the pant legs out and check that it looks visually correct and that nothing is twisted before marking and cutting. You might also like to take a note of the measurement of the outside leg between the top of the waistband and the fold of the new hem.
]]>
The pocket has an outer and an inner pocket bag and a pocket facing.
1. Firstly interface the edge of the pocket on the wrong side of the front leg with iron on interfacing. I have used black here so that it can be seen in the photo, but you will need to use interfacing which is nearer to the fabric colour and will be less obvious.
2. Pin and sew the outer pocket bag to the front leg of the pants, with right sides together.
3. Clip the curves and trim the outer pocket bag seam. This should give a nice curve and reduce the bulk of the seam.
4. Turn the outer pocket bag so the wrong side is against the wrong side of the pants. Roll the pockets bag slightly to the inside so that it does not show from the right side of the pants, as in the photo.
5. The pocket can now be top stitched, shown below, however if you do not want to top stitch then understitch the seam allowance to the pocket bag instead.
6. Overlock (or finish with a zig zag stitch) along the bottom edge of the pocket facing.
7. The facing should now be sewn to the inner pocket bag along the bottom edge with the wrong side of the facing against the right side of the pocket bag.
8. Sew together the inner and outer pocket bags only, right sides together, as in picture. The outer edge of the pocket will be sewn at the same time as the side seam of the pant leg.
I will make sure I share the finished pants soon! Happy pocket sewing.
]]>Previously we have covered how to create a lining pattern and sew a skirt with a slit. This week it's the final blog on how to hem a skirt or dress with a slit. Apologies for the furry towel background this week, we are away on holidays and I had to improvise and use a towel:)
There are two options that I'll run through here for hemming. The easier option which involves simply turning it up and the slightly more involved version which is using a mitred corner.
With either option start by pressing up the hem either side of the slit, making sure they are the same length and one doesn't hang down further on the other side. Mark the fold line with a marking pen once pressed.
Option 1, the easier solution
1. Start by overlocking down the raw edge of the slit opening (not shown here). Then fold the slit opening back on itself, right sides together, as shown below. Pin exactly on the fold line. This is where you are going to stitch.
Option 2, with a mitred corner.
1. Fold the hem up half the amount (so if your hem is 2cm, fold it up 1cm) and then fold in the same amount from the raw edge of the slit.
2. Fold both the hem and the slit in again the same amount, 1cm in this case. Then press and pin.
And there you have a hemmed slit.
]]>1. Start with marking your lining and main fabric pieces as shown below. The seam allowance for this pattern is 1.5cm so I have drawn the stitching line 1.5cm away from the raw edge of the slit opening, as shown. Where these lines intersect make a dot (shown in red below), these dots are very important for sewing accurately. I also attached a little interfacing over the dots to reinforce this area. Note that I have already hemmed my lining here.
2. Sew the two lining pieces together up to the top dot. I like to use a smaller stitch length up to the dot to reinforce this area. Repeat this for the main fabric piece also.
3. Press the seams open on both the main fabric and lining fabric. The dots are marked in black below. These are really important for accurate sewing. If you need to re-mark these dots do so now. Effectively you are drawing on the stitching lines from the raw edges of the fabric. Where the lines intersect is where the dots will go. See blow.
4. Place the two pieces wrong sides together, as it will be when inside the skirt/dress when worn. Line up the top dot on the main fabric with the top dot on the lining fabric.
5. Keeping the top dots lined up manipulate the lining fabric so that the right side is facing the right side of the fabric on the slit opening. The lining fabric needs to follow the same angle as the top of the slip opening and the second dots also need to line up. Pin as shown below. Do not pin to the main part of the skirt or dress, just the slit opening section and lining.
6. Move the main fabric out of the way from underneath and sew from the top dot to the second dot. Use smaller stitches and back tack here.
7. When you get to the second dot, insert the needle and lift the presser foot. With the needle still inserted take a pair of sharp scissors and snip to the needle.
8. Snipping here will allow you to manipulate the lining fabric so that the raw edges can be lined up with the main fabric vent opening. Then sew to the bottom.
9. Repeat for the other side.
10. Give the garment a good press.
And there you have a skirt or dress slit with lining!
]]>
]]>
Whilst I am here I wanted to also share this great book that I've found really helpful for creating lining patterns. It's definitely worth adding to your library if you like to create your own lined patterns.
1. Take the original pattern with slit. The red dotted line shows the stitching line and the fold line is where the slit will fold back.
1. Threading an overlocker or sewing machine.
This is probably the most well known use of tweezers. I always have a pair of them hanging on my overlocker. Why? Because it's much easier to thread an overlocker with a pair of tweezers as you can grab the thread and get in hard to reach places, whilst holding the thread steady. Threading needles on both a sewing machine and over locker can also be easier with tweezers as I find it increases accuracy.
2. As a stilletto. When sewing a pair of tweezers can make a great alternative to a stiletto for manipulating fabric that is near to the needle as it passes through the sewing machine. You can hold the tweezers together or apart, but either way the fine point of the tweezers helps to hold the fabric. It's also a lot safer as fingers don't need to get as near to the stitching needle. Here are a couple of examples of fiddly sewing jobs where I find tweezers useful.
A. Attaching gathers is a good example. Whether it's bringing the two layers together, pulling up a gathering stitch or smoothing out the gathers as you sew tweezers help to make the job easier.
B. Attaching an outer curve to an inward curve.
Again there's a few different ways you can use your tweezers here, as a stilletto, or to hold the two layers together or pull the top or bottom layer in line. Once you remove the pin before it goes under the presser foot you can actually keep the two layers clamped together as it passes through, increasing sewing accuracy.
3. Starting the turning of a loop with a loop turner. I like to use my tweezers to start off the turning of a rouleau strap with a loop turner. The beginning of this process can be a bit fiddly and hard to get going. I find it easier to use tweezers to clamp the outer fabric and gradually pull it over the fabric that needs to be pulled inside the tube, whilst pulling on the loop turner at the same time.
4. Unpicking. Tweezers are a great tool for removing all the little threads in a garment after unpicking. I find using tweezers quicker and more efficient than fingers alone.
5. Cleaning the bobbin area under your machine. Whether it's fluff or a thread, tweezers make pulling these things our much easier as sometimes fingers are just a bit big for the job.
6. As a point turner. If you are like me you'll often be searching for your actual point turner and instead reach for other tools (like scissors - potentially dangerous!!). I think that tweezers are good at this job and also a fairly safe bet that you won't end up with a hole in your project. You'll need to hold the tweezers closed whilst you do this.
7. Turning corners. If you are like me and you like to turn corners with hemostats (see image below) or you fancy giving it a try then tweezers work as a great alternative.
Tweezers make a great alternative to the hemostats shown in the process below.
Please get in contact if you have any other great ways that tweezers can help when sewing.
]]>
I have been making the B6453 out of a cotton yarn dyed dobby (the dobby refers to a slight texture woven in to the fabric). The fabric is medium to heavyweight and whilst I have been pleased with the results the top of the back bodice over my shoulder blades was not sitting as I wanted. So I decided to add just two pieces of boning on either side of the centre back zipper.
Here is how it looked before the boning was added. It wasn't terrible, but there were quite a few horizontal lines running across the back bodice.
2. If you are using a casing like I am you will see that there are grooves running down the edge of each side. I use these as a guide for stitching. Pin using these lines and stitch in place. I am using an edge stitch foot here to make it easier to follow the lines accurately. Stitch right on the edge of the casing on both sides.
3. Once it's stitched to your lining you will need to make your spiral steel boning the correct length. You can also buy pre-cut boning but I am using a continuous length here. Lay the boning on the casing. Make your boning slightly shorter that the casing so that you can stitch across the bottom and top opening of the casing to keep the boning in place. 1-1.5 cm shorter will be enough. I am using a tool from the local hardware shop to cut the boning.
]]>
Obviously this meant getting out the satin piping. And here they are!
I have done a few 'Tips On Tuesday' on various piping tips, but I realised that I've never shared my favourite, very simple, but super effective piping tip! (From step 4). Here you'll find the other blogs that I've written before on piping:
Here's this week's piping tips:
1. Take your piping and the fabric pattern piece that you are attaching the piping to. I used 3mm satin piping for my daughters pjs. The image below is 3mm cotton piping in lilac. I find the 3mm size to be perfect for garments. Here you can see the collar piece on the right.
]]>
Often, if you are like me you will make certain tweaks to you pattern, which then means you can't use the facing pattern pieces that it came with, without making the same tweaks. So... here's how to take your pattern piece and create a facing and lining pattern.
Why use facing and lining I hear you ask?! Well I prefer this option because if the lining fabric isn't a perfect match it doesn't matter if it pops out the top slightly, plus I think it gives it a really professional finish. It's also a perfect place to insert a label or some embroidery.
Here's how:
1. Take the pattern pieces that you will need to create a facing and lining pattern piece for. My dress has a bodice with a princess seam so I needed to take my centre front, side front and back pattern piece.
Then mark your seam allowance on to your pattern piece. This pattern had a 1.5cm seam allowance. Below you can see the centre front and side front pattern pieces. I also repeated these steps for the back pattern piece.
2. If yours is a dress with a princess seam like mine as a result you will have two front pattern pieces (centre front and side front), pin the pattern together along the stitching line at the top, like so.
3. Take your ruler and mark 5cm down from the stitching line at the top, run this line across both front pattern pieces.
4. Place a piece of tracing paper over the top of the pinned pattern pieces and draw around the shape of the facing piece. It is useful to add a notch on the facing piece where the stitching line on the side front and centre front meet. See. the red mark on the second photo. This will help at lot the sewing stage.
6. The unpin the pattern pieces from step 1. The blue line should look something like the picture below.
When you finish you should have:
In the picture below you can see the front facing piece, side lining piece and centre front lining piece.
9. Once you have your pattern pieces cut out you are ready to start sewing. Start by sewing the lining pieces together.
]]>
Here's a few tips and things to think about for picking the right fabric for your next project.
1. If you are using a store-bought pattern start by looking at the back of the pattern envelope, here you will find suitable fabric suggestions.
2. The most important guidelines to follow is whether the pattern has been drafted for woven or knit fabrics. Patterns for knit fabrics will often have very little ease built into the pattern, as the fabric itself will stretch. Unless you are going to make alterations to the pattern to accommodate stretchiness make sure you chose either woven or knit fabric, as per the pattern instructions.
3. Stretch - That said, some woven fabrics also contain stretch. If the fabric composition contains some elastane it will have more stretch than a fabric without. Think about whether you want this additional stretch in your garment. Give your fabric a pull to test the stretch to see how stretchy it feels. Has the pattern been drafted for extra stretch? If it's a knit pattern does your stretchy fabric have enough stretch? Knit patterns will usually list the percentage of stretch that is required on the back of the envelope. Click here for more information on assessing your stretch percentage.
3. Another consideration is the weight of the fabric. At Sewing Gem we will list the GSM of each fabric. Most sewing patterns will state whether a light, medium or heavy weight fabric is required.
Here's a general rule for fabric weight.
Light Weight Fabrics | 110 GSM and under - think chiffon, voile, crepes |
Light to Medium Weight Fabrics |
110 - 150 GSM - think lightweight cotton lawn, rayon, viscose |
Medium Weight Fabrics | 150 - 220 GSM - think tencel, knits, linen, craft cotton |
Medium to Heavy Weight Fabric | 220 - 320 GSM - think lightweight denim and heavy linen. |
Heavy Weight Fabrics | 320 GSM + Think denim, heavy cotton twill, wool |
4. Drape refers to a fabrics ability to fall and create wavy folds. Softness vs Stiffness are the key factors in assessing this; the stiffer the fabric the less drape it has. Soft fabric tends to drape closer to the body forming wavy folds and stiff fabric hangs away from the body. If you want to create a floaty, easy breezy summer dress then choose a fabric with lots of drape, such as silk, viscose or rayon. Hold your fabric and let it hang. Hold it up against your body and walk around with it. Does it swish in the way you want it to? If you're sewing a tailored jacket you'll need a firm fabric with little drape.
5. Handle - Do you like your fabric to feel soft against your skin? Is a soft fabric going to work for the garment you're planning on making or does it need to be firm and create structure?
6. Opacity - Hold your hand underneath your fabric to assess how see-through it is. If you can see through it you might like to consider lining your fabric. For most projects a lining similar to the main fabric works well.
7. Consider the pattern on your fabric. Firstly is it directional? If it has a big bold print or stripes or checks does it need to be pattern matched in certain areas on the garment. Centre front and centre back usually cry out for pattern matching. Find out more about pattern matching here.
8. Lastly play with your fabric. If you think you've found the right fabric buy a little bit extra. Use this extra bit to play with it - sew with it. If your garment has darts (or princess seams or similar) sew the dart in the practice fabric, the press it. Ultimately assess if it is going to work and whether you like what you see?
Here you'll find additional information on selecting fabric from our store. Happy sewing!
]]>
If you are someone (like me) who will spend ages matching seams, unpicking and re-sewing to achieve perfection then this one is for you!!
Usually when sewing intersecting seams the seam allowances are stitched down. Like so...
The downside of this is that is can interfere with the drape of the garment. This is because it can create tension. The following tip also makes it much easier to match seams perfectly, so it's worth considering for centre back seams or other highly visible areas.
1. Sew seams as per instructions.
]]>
I have to say that I love this pattern and I can see many more in my future. Next time I will need to do a rounded back alteration. Here's why and a quick easy pattern alteration to fix it...
You can see that (unfortunately) my back is slightly rounded and my shoulder blades are quite prominent. This creates a gape in the shoulder strap.
1. Here is the Stitch buzz placket marking template.
2. Transfer the markings to the wrong side of your fabric and cut the template shape out of the fabric. You are going to need to cut two of these out of your chosen fabric (one for each sleeve).
This week I thought I'd do a quick run through on using the 'Quick Pocket'. We stock two quick pocket products - one which includes a 4 1/2 inch and 5 1/2 inch template and another product 'The Quick Pocket 8', which as the name suggests is an 8 inch template.
I used the 4 1/2 inch template for the purposes of this blog.
The instruction booklet included with the templates is fantastic tool to guide you through the process. The tool itself makes the marking of a welt pocket super simple. Here's how to create a pocket welt using the template.
1. Start by cutting the pocket welts, pocket bag and interfacing to size, as per the instruction book guidelines.
]]>
Balanced darts are used in garments to reduce a 'stepped' look when sewing darts in bulky fabrics. The additional fabric that is added actually creates a smoother silhouette and provides a good fit.
Here's how:
1. Mark the dart on your garment.
2. Pin the dart then cut an extra rectangle of fabric that is bigger that the dart (longer and wider).
3. Re-pin the dart with the rectangle of fabric underneath.
4. Stitch the dart beginning and ending in the excess fabric.
5. Pull the excess fabric away from the stitching line. Cut the excess fabric to match the shape of the dart on the main garment.
6. Press the dart apart from the excess fabric so that the dart is 'balanced' and there is the same amount of fabric on both sides of the stitching line.
]]>
I hadn't sewn with sequins before and it was on my sewing bucket list, hence why I gave it a whirl. Halfway through the sewing I held it up to my friend and in a moment of hesitance asked "is it too much?" she replied "it's a sequin dress Gemma, what did you expect?". Naturally I soldiered on, keeping everything crossed that I'd be able to rock the spangly, sparkliness that sequins bring to a frock:)
Here are my tips for working with sequins:
1. Can you sew through your sequins?
First of all, test sewing on a small piece of the fabric.
I always start by test sewing on a small piece of the fabric. Some sequins will need to be removed at the seamline as they are too chunky to sew through and will result in broken needles. Luckily I chose a fabric that had micro sequins, which I could sew through and this definitely made my life easier. If you do need to remove the sequins for sewing try to cutting the sequins themselves away rather than cutting the thread that holds them to the garment. Often sequins are sewn on continuously so if you remove one it will continue to unravel.
2. Use a denim/jeans needle in your sewing machine.
A denim needle is a great option for sewing with sequins as it nice and sturdy. Buy a pack though as the odd one might still break.
3. Hand sew sequins back on at the end if you loose too many.
If you have a section that looks a little sparse or bald keep a collection of sequins that have fallen off and sew these back on by hand to rectify this.
4. Encase the raw edges of your garment
As well as lining my dress I used the netting at the selvedges of the fabric to bind the raw edges of the fabric. This reduced the number of sequins falling off my dress.
5. Line your garment.
It's definitely worth lining sequins as they can be uncomfortable to wear, particularly where they might rub.
6. Use a similar fabric for a toile
If you like to make a toile when you sew, use a similar fabric to the sequin fabric. A lot of sequin fabric will have a percentage of stretch, so if you want to make sure you use fabric with a similar stretch.
7. Use Iron on Interfacing to add structure
I needed my sequin fabric to be more structured and have less drape so I applied iron-on, woven interfacing to the wrong side of the fabric. I found that this made it easier to work with.
8. Don't use your best scissors
Your scissors or rotary cutter will dull when cutting sequins so don't use your best pair.
9. Use a pressing cloth and start with a low heat
Take care when pressing. Start with a low heat and definitely use a pressing cloth. Try and press from the wrong side of the fabric where possible.
10. Accept that you WILL end up with sequins EVERYWHERE!!
Happy sewing with sequins!!
]]>
Tip 1: Use thin card under the pleat to avoid pressing in ridges.
1. Mark your pleats
2. Hem - I've used a blind hem stitch in a contrasting thread so that you can see the stitching, but a matching thread would look better!
3. Here is the view from the front. You will want to give it a good press from the front and the back.
Tip 2: Use thin card under the pleat to avoid pressing in ridges.
1. Carefully pin your pleats in place using the markings on the fabric.
2. Baste the pleats in place using a long stitch.
3. Press your pleats in place. Steam can be useful here. Remember to place the card between pleats to stop ridges forming.
]]>This week I thought I'd run through a few tips for sewing a French dart. I have taken a lot of this from Reader's Digest Complete Guide to Sewing (a must have!).
1. Mark the dart on the wrong side of the fabric. Then staystitch 3mm (1/8 in) inside each stitching line. Do this by sewing to the point of the dart and taper to meet 2.5 cm (1 in) from the point of the dart.
2. Slash through the centre of the dart to where the staystitching intersects. Sometimes the pattern will already have the centre section of the dart removed - if so you won't need to slash.
3. Pin the dart matching both dart legs. Stitch dart to the point.
4. I like to chain off the dart point. I do this by reducing my stitch length to 1.5 mm as I get near to the point of the dart, I then continue stitching off the dart to create a chain. Then I lift the presser foot and stitch into the fold of the dart to finish.
5. Clip seam allowances to allow dart to curve smoothly.
6. Press using tailors ham.
]]>First up, How long should my buttonhole be?
Your buttonhole should be the button's diameter plus 3 mm.
For a dome or ball button it should be the circumference of the button plus 3mm.
Next, Where exactly should my horizontal buttonhole be positioned?
The first buttonhole at the neck line should be the button diameter plus 6mm from the neckline of the garment (see image below).
Your buttonholes should be 3 mm past the centre front (into the buttonhole extension).
The width of the fabric extending past the centre front should be exactly the diameter of the button.
And lastly one top buttonhole tip:
Always do a few test buttonholes to check the size and that you can pass your buttonhole through easily.
Happy sewing of buttonholes! :)
]]>
1. Interface the area where the buttonholes will go. This will strengthen the fabric and decrease the chances of holes.
2. Always test your buttonhole on some scrap fabric before starting on your actual fabric. The buttonhole will need to be approximately 0.3mm longer than the button. Does the button pass through?
3. Make sure you are familiar with the order that your machine completes an automatic buttonhole. Practice sewing a few on some scrap so you get a feel for the order.
4. Mark where the buttonhole will go. Where the machine starts stitching is the most important mark.
5. Add Fray Stoppa, Fray Check or something similar on the front and the back of the buttonhole before opening.
6. When it's dried you can open your buttonhole. My preference is a buttonhole cutter. You'll just need to make sure you have something underneath to protect your table. Carefully line up the buttonhole cutter.
Alternatively a sharp seam ripper works well too. With this method I like to place a pin perpendicular to the end of the buttonhole so you don't rip through beyond the buttonhole.
A finished buttonhole!
]]>1. My first 'top tip' is to use spray starch for fine fabrics or knits that roll at the edges. Spray the starch on the fabric and then press with an iron.
It's best to always test the starch on a small area of the fabric first as it can leave a mark on certain fabrics.
This is jersey with spray starch (bottom piece) and without (top piece).
When used on fine and delicate fabrics it makes the fabric stiffer which then makes them easier to work with.
2. My next tip is to use an organza pressing cloth.
I've used a piece of white silk organza (you only need a small amount). Overlock around the edge so that it doesn't fray. The great thing about organza is that it is translucent, which means you can see the fabric that you are pressing underneath.
A must have for delicate fabrics or black fabrics that shine when you press them.
3. Finally use a clapper! A clapper is a great tool for getting a nice crisp finish. Apply the heat of the iron to the area and then hold the clapper (with some pressure) in the same area. This helps with reducing bulk, create permanent creases and getting seams inside garments to lie flat.
Happy pressing!!
]]>Here's a couple of quick tips that will hopefully help to create perfect gathers.
I feel that both of these tips work best when you have quite a lot of fabric to gather, rather than a subtle gather.
Tip 1.
An extra row of gathering stitches outside the seam allowance.
Add an extra row of long stitches (length 4) outside the seam allowance.
For example if you're working with a 1.5cm seam allowance stitch at 2cm.
This extra row of stitching outside the seam allowance keeps your gathers nice and straight on the stitching line. The image below shows the extra row of stitching in black.
When the gathering in the photo above is attached to the garment your stitching line will be between the bottom light blue stitching line and the black stitching line.
Tip 2.
Use Dental Floss
Use dental floss and a zig zag stitch.
Zig zag stitch over the dental floss - make sure you don't catch the dental floss with the needle.
Secure one end of the dental floss when pulling up. Here I have wound it around a pin to secure it. Then pull the dental floss to gather the fabric.
Secure the other end once gathers are completed. You can stitch over the dental floss to secure it in place.
Once attached to the garment you can remove the dental floss if you would prefer.
Tip 3.
If you do a lot of gathering it might be worth investing in a ruffler foot - like this one! I’ll write more about this great device in another blog. Watch this space!
Happy gathering!
]]>