This week is the second section of 'Tips For Taking Up Pants'. You can find the first section here.
Once you have completed the measuring and marking stages that can be found in the previous blog follow the steps below:
1. Cut the excess off the bottom of the pants. This can be the scary / no turning back part!:)

2. Turn the pants inside out and press the hem up to the first line. In this case I pressed it up 1.5cm and I used a hot hemmer to help me. The raw edge of the pants should touch the marked line for where the pants will finish once hemmed.


3. Repeat this step again by turning the hem up once more. You need to make sure that the bottom of the pants are folded exactly on the stitching or marking line that will become the new bottom edge of the pants.


4. When folding, I like to snip some of the bulk out of the side seams as shown below. Make sure you don't remove too much as when it is folded you want it to look the same all the way around.


5. Measure the amount folded up to check it is the same all the way around. Give it a good press. I find using a sleeve or trouser board makes the job easier as it lifts the area that needs pressing off the rest of the pants. Place a few pins in to hold the hem in place.

6. Turn the pants right side out. As you are going to be sewing from the right side of the jeans or pants take the pins from the wrong side and place them on the right side, as shown below. Measure to check that each pin is the same distance from the bottom of the pants and that the pin is catching the fold on the inside of the pants. I pinned mine at around 1.3cm as the fold inside was 1.5cm. Check the inside and outside before sewing.

7. Depending on the pants or jeans that I am taking up I like to use a denim needle. It is a good idea to try and match your top thread to the rest of the pants and often a denim thread works well. I prefer to use a standard thread in the bobbin. I also like to use a longer stitch length for jeans, depending on the fabric, around 3 - 3.5mm. You can find a selection of denim thread and needles here.
I will always test my stitching on some scrap fabric before I begin (I often use the section that I snipped off the pants in step 1). Fold it over a few times so that it is similar to the hem that you are going to be stitching. Before sewing the actual hem I compare the quality of the stitching and the stitch length to the stitching already on on the pants and amend accordingly.

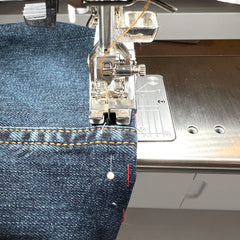
8. I use the pins as a guide as I sew. I also like to use an edge or guide foot. You can see that I line the guide up with the fold of the jeans. This really helps to keep the stitching the same distance from the bottom edge of the pants.

9. When I start sewing I don't back tack, I prefer to leave both my bobbin and needle threads long. I will secure these at the end.
10. As you get near to the bulky side seams you may well find it useful to use a 'jumper'. Sew up to the bulky seam and then insert your needle and lift the presser foot. Place the jumper at the back of the foot as shown in the image below, this extra height on the foot will make sewing over the raised seam much easier as it makes the presser foot level.

11. As you come round to meet where you began stitching overlap the stitching by one stitch and then pull the pants out of the machine leaving both threads long.

12. Using a needle pull both threads through to the wrong side of the pants and sew a few stitches to secure.
One pair of hemmed jeans!!

Next week we will show you how to hem jeans by using the original hem.